Product Instructions
Here you can find help with installing or setting up some of our products:
Spinning Flagpoles
To assemble top and bottom of pole together (2-piece poles only):
-
Locate notch in open end of lower section (some models have threaded end).
-
Slide 3-inch metal rod that protrudes from the top section into the bottom section, lining up screw with notch in bottom section (or screw top & bottom section together).
-
Press two sections of pole against each other until flush.
-
CAUTION: Do not jam pole sections together
-
Securely grasp the ornament on the top half of the pole with one hand and the bottom section of pole with the other hand and GENTLY turn bottom section in either direction, being careful not to over tighten.
-
The two sections of the pole should now be locked and the top half of pole should spin freely.
To Mount Traditional Style Flag (heading and 2 grommets) on pole:
-
Remove thumb-screws from flag fasteners (EZ Grippers), slip first fastener up bottom of flagpole and position just below swivel clip. Note: Swivel clip and snap hook at the top are not used with traditional style flag.
-
Position opening in fastener under the top grommet of flag.
-
Insert the screw through the top brass grommet on the flag and screw back into the plastic ring. The screw will hold the ring tightly to the pole and the flag to the ring.
-
Repeat with lower grommet.
-
Both grommets must be positioned above joint in order for pole to spin. Do not use oversize flags.
To Mount Banner Style Flag (those with a pole sleeve) on pole:
-
Slide pole through banner sleeve
-
Locate pre-slit tab sewn inside top of banner sleeve
-
Attach snap hook (on swivel clip) to pre-slit tab. Note: Flag fasteners are NOT used with banner style flags.
-
Caution: Spinning poles are not to be used with flags heavier than nylon
-
Flags should not be flown in extreme wind conditions
To Disassemble Spinning Pole (2-piece poles only):
-
Hold ornament firmly in one hand and bottom section of pole in the other hand.
-
Line up small raised arrow on bottom section of pole with metal screw on joint.
-
Gently pull sections apart (or unscrew for threaded models). The two sections should come apart easily.
-
Caution: Do not use force. If top and bottom do not separate easily, repeat step 1 and turn pole slightly in either direction while pulling gently.
-
The diameter of the pole is 1". If you need a bracket, you can view our selection here. Any of the 1" size brackets will work with the spinning flagpole.
Indoor Presentation Sets
-
Attach flag to pole by inserting tab in pole sleeve over screw on pole.
-
Place the ornament on the pole. Align hole in the ornament with desired position on pole. Drill hole in the pole through the ornament hole.
-
Insert the screw eye through the hole in the ornament and into the pole where the hole is drilled out. Gently tighten to secure ornament to pole.
-
Fold tassel in half and insert through eye hook.
-
Screw the top and bottom sections of the pole together. CAUTION: Be careful not to over-tighten or cross thread.
-
Insert the bottom of the pole into the floor stand. If the pole does not go into the stand easily, check and make sure the reducer insert has been removed from the floor stand.
Sectional and Telescoping Flagpoles
-
Dig a hole 2 inches deeper than length of ground sleeve and approximately twice its diameter. Line bottom of hole with 3 inches of tamped stone for drainage.
-
Prepare a concrete reinforcing mixture- 1 part cement, 2 ½ parts sand & 5 parts stone.
-
Wet down hole with water so that earth doesn't take water away from the concrete.
-
Set sleeve upright in center of hole and fill in around it with concrete mixture. Be sure sleeve extends ½" to 1" above ground after final grading. Use a level at two points on the sleeve 90 degrees apart to make sure its plumb. Check plumb several times while filling hole. Level off smoothly at top. Do not allow concrete to get into or under sleeve.
-
SECTIONAL POLE ONLY: Assemble pole sections by sliding together, with swaged ends extending upwards into next section. The top section is un-swaged. The second section from the bottom is drilled for the cleat. The remaining sections make up the rest of the pole and are interchangeable. Attach cleat, using the self-tapped screws supplied.
-
Screw ball ornament into top of truck. Thread halyard through pulley and tie ends together. Secure truck to top of pole, using a screwdriver to tighten set screws. Make sure pulley is aligned with cleat.
-
SECTIONAL POLE ONLY: To affix snap hooks:
-
Pinch halyard between thumb and forefinger, forming loop.
-
Push loop through eye in snap hook-continue pushing until loop reaches end of snap hook.
-
Bring loop over end of snap-fold back towards halyard.
-
Pull snap hook in opposite direction, thus tightening it into position.
-
Affix second snap hook the appropriate distance above the first, according to the size of the flag being flown (example- approx. 3' for a 3x5' foot flag).
-
When concrete has set, insert butt end of pole until fully seated in sleeve. Rotate pole until pulley faces in opposite direction from prevailing wind.
-
Use strip of caulking (Mortite, for example) to seal space between sleeve and pole.
-
To add a brass or nylon snap to a flagpole rope:
how to install a snap on a flagpole rope

-
Fold the rope into a loop and slip it through the eye in the bottom of the snap.
-
Pull the loop through the eye and over the top of the snap.
-
Pull the rope tight and you're done! No cutting, no knots. View our snaps here.
U.S.A. Home Flag Set Assembly Instructions
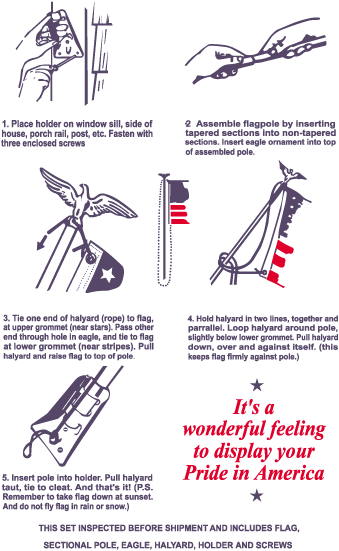
Folding the U.S. Flag

-
Fold the Flag in half lengthwise.
-
Repeat, fold in half lengthwise again, being careful that the blue field is on the outside.
-
As one person holds the Flag by the blue field, another makes a triangular fold in the opposite end and continues to make triangular folds until the entire Flag is in a triangle.
-
Tuck the loose edge of the Flag into the pocket formed by the folds so that only the blue field and white stars are visible.
Iron-On Patch Instructions
-
Garment should be clean and freshly laundered (including new).
-
Set iron to "COTTON", 400 degrees for five minutes.
-
Thoroughly iron area of garment where patch will be placed.
-
Place patch on garment, embroidery facing up.
-
Place cloth or light towel over patch and using a slow, circular motion, press firmly for 30 seconds.
-
Turn garment inside out, and iron the back of the patch for 30 seconds.
-
Let cool for one minute. If edge of patch can be lifted, repeat step 6.
-
Permanence of application guaranteed by sewing. Do NOT use unironable fabrics (low melting point) such as nylons, vinyls, or leathers. Do not bleach.